Problems Picking Software
Have you ever implemented a new technology at work and had an “oh crap” moment? As in, “Oh crap, we never accounted for ______!”
I know I saw it a lot at Amazon. It usually came up when people were rushing through requirements in an effort to save time. Unfortunately, that time saved turns into a lot more time wasted as people have to develop workarounds or worse, don’t even use the technology.
I developed a framework that virtually eliminated “oh crap” moments. I saw a huge difference in quality on the projects where I stuck to my framework and on projects where I skipped it in order to save time. This article provides a high level overview of that framework I use. I’ll explore each step in more detail in future posts.
Rich Modeling Process
I’ve always been surprised how resistant some technologists are to start with process model. They throw up objections like, “Let’s just build a MVP” or “We need to move faster.” The truth is, the process model helps simplify the MVP and speeds up the end to end process. With a clear process model, you not only design the MVP, but you also have a clear roadmap of value-added activities your users already want. I follow a multi-step process to build rich process models. They are:
- Build a high level process flow diagram
- Create a simplified value stream map for current state and desired state
- Detail process inputs and outputs
- Perform a risk assessment
- Document detailed processes and support
- Define responsibilities and owners
Build a High Level Process Flow Diagram
I use this step to familiarize myself with the problem space, whether it’s an existing process or a brand new one. This creates a general outline of the step by step process and various decision points in the process. The best process flow diagrams have swim lanes to indicate responsibility, but it’s not required at this step. I only document the journey of the object or information (e.g. a job application) that is being transformed. This step provides the foundation for the rest of the framework.

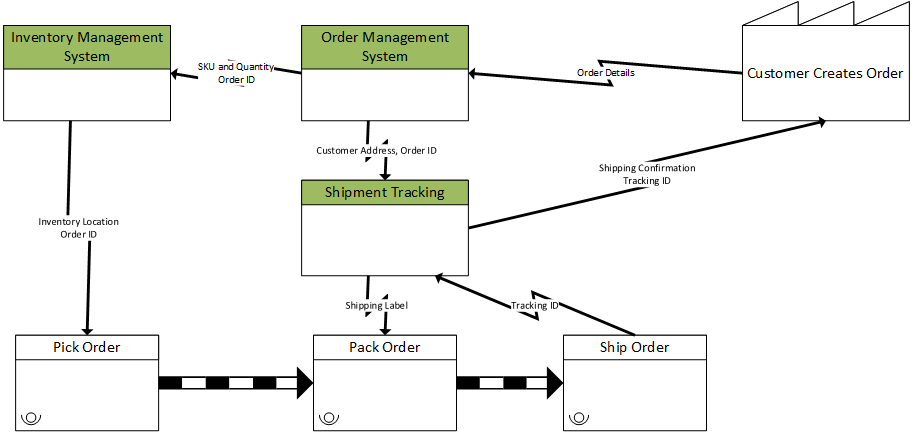
Create a Simplified Value Stream Map: Current State vs. Desired State
I use this step for two purposes: 1) I document how technology interacts with the process and 2) I explicitly document the gaps between the current state and the desired state. With a value stream map, it’s clear which processes are performed manually vs. by a computer or algorithm. It also documents what information is being passed between the user and the system and between systems. By documenting both the current and the ideal state, you create a mini-roadmap for development.
I call this a simplified value stream map (VSM) because it may not be necessary to include all elements in a traditional value stream map (i.e. push vs. pull process, inventory build ups, time durations, etc). I only include the minimum number of elements required to clearly document the “happy path” process flow and all required information exchanges. The ideal state only includes processes and information exchanges that add value for customers.

Detail Process Inputs and Outputs
A VSM is useful for visualizing the process and technology interactions. However, it does not succinctly capture what exactly is required for each process step now what exactly flows between each step.
For this task, I like to use a tool called a SIPOC. SIPOC stands for Supplier, Input, Process, Output, Customer. This framework answers the following questions: for every process step, what is required as in input? What is the output of the process? Who provides the input? Who receives or uses the output? Using this framework, I start to understand which inputs can be automated and which ones require human input.

Perform a Risk Assessment
This is my favorite part of the entire process. I go through every single process step in the SIPOC and identify how the process can fail. What if the input isn’t provided? What if the output is defective? What conditions can make the input unusable? Another term for this framework is a Failure Mode and Effects Analysis (FMEA). After I’ve defined how each process can fail and what the effect of the failure is I rank the criticality of each failure. The traditional method is to assess the probability and severity of the failure. I create contingency plans and prevention plans for the most critical issues.

Time for Technical Requirements
At this point, I have enough information to create high quality technical requirements. I will go through the ideal case VSM, SIPOC, and FMEA and identify all the gaps between current state and future state. Which information inputs don’t exist yet? What processes don’t exist? Which failure modes must we account for up front? If I cannot build technology to account for a process or failure mode I must create a manual work around or contingency plan and document it.
In some cases, the entire process for a critical step is undefined or unclear. In that situation I use the following two steps.
Document Detailed Processes and Support
When building or improving processes, the above tools are not always enough. In particular, every single process step probably has a sub-process or routine required to transform and input into an output. For example, when creating an open position, the process models may simply state “Create job description.” This process step has many sub-tasks, such as creating a job title, defining the hiring manager, specifying a location, salary range, etc (these should be defined as inputs in the SIPOC). For virtual processes such as this, simply specifying the method may be sufficient. However, for physical processes there are other requirements, too. For these I use the 6M framework.
- Method — What is the step by step process to complete this step?
- People (Man) — Who is required to complete this step? What training or certifications do they need?
- Material — What are the material inputs necessary to complete the step?
- Machine — What equipment must be utilized?
- Measurement — What are the key metrics to measure the effectiveness of this process?
- Environment (Mother Nature) — What conditions are necessary? Good lighting? Temperature ranges, etc. Are there certain operating specs we must work within?
This process is good for root cause analysis after defects arise. I like to go through it upfront in order to prevent defects in the first place. In particular, I’ll use the method to define technical specifications. There also may be cases where critical failures can be prevented by ensuring all necessary conditions are present (e.g. do not start the machine if the temperature range is out of spec and notify the operator).
Define Responsibilities and Owners
This step helps me define my implementation plan for the technology. It tells me who needs to be involved and who needs to be trained to use the system. I look for three main actors:
- Who is responsible to complete the task? I.e. who actually performs the work?
- Who is accountable for the work? I.e. who’s butt do you kick if the work isn’t completed properly?
- Does anyone support the person who completes the task? Maybe somebody will bring the materials over or do a quality check after the work is complete.
This step is less important for creating technical requirements. I do use this step, however, to ensure that I consult all the appropriate stakeholders in the technology development.
What’s Next?
In upcoming posts I’ll describe each step in more detail. I’ll also relate each step back to building technology requirements. In all the best technology implementations I’ve been involved in, we developed a clear understanding of the process, failures, and workarounds before writing any tech requirements. This allowed us to make explicit value decisions in determining which features we should deploy first and where we should employ manual solutions. In the worst implementations, technology is implemented according to what is deemed easiest or fastest. The truth is, the entire process was probably never even considered.
This framework is a proven method to develop better processes and better technologies. Using this framework has reduced my frustration and waste in the software development process.